Again, since there is no GUI available, you'll have to compile a script to create your user accounts.
There are 3 possible ways of creating user accounts on your W2K8 core: create a vbs scripts, or use the DSADD or csv command line possibilities.
To create a vbs script, log on to your server and create a vbs file where you would like it with the command: edit c:\temp\user.vbs. In this case, I'll create a user.vbs file in my temp folder.
Then, we'll have to use our scripting knowledge to create the user and their desired attributes. I'm not going to elaborate on all the options, since there are too many, but here is the standard example which you can adjust to your needs:
Set objOU = GetObject("LDAP://OU=Users,OU=_Test,dc=fabrikam,dc=com")
Set objUser = objOU.Create("User", "cn=Kristof Vanweert")
objUser.Put "sAMAccountName", "KrVa"
objUser.SetInfo
Also, Microsoft provides a site on which you have a ton of script examples you can use to extract information: The Script Center Script Repository
CSV files are saved in a csv format, so to create one, we can enter edit c:\temp\user.csv. In the blue screen you receive you can enter again the information you want, for example:
DN,objectClass,sAMAccountName,sn,givenName,userPrincipalName
"CN=Kristof Vanweert,OU=Users,OU=_Test,DC=vm,DC=local", user,KrVa,Vanweert,Kristof,kristof.vanweert@vm.local
Notice that the first line declares all the variables that have to come back on every user you create below. Also, these variables are the same you can use in a vbs script.
When your file is finished, you can import it with the command: csvde -i -f c:\temp\user.csv. A list with all options you can add to the csvde command, you can find here.
Last, and probably easiest to work with, is the DSADD command. It features all the most important attributes, but not everything can be done with this command.
Users created with this command are saved in a cmd file: edit edit c:\temp\user.cmd which is later simply executed from the command line. In the command below, I create my user account in the correct OU and set a temporary password:
dsadd user "CN=Kristof Vanweert,OU=Users,OU=_Test,DC=vm,DC=local" -samid KrVa -upn KrVa -fn Kristof -mi THJ -ln Vanweert -display "Kristof Vanweert" -pwd Azerty123 -mustchpwd yes -pwdneverexpires yes
Again, a whole list of switches you can use, can be found at microsoft.
Of course, it is pretty obvious these commands can be adjusted to create OU's, groups, computers, ... Also modifying, deleting, retrieving information, ... can be done by changing a few parameters in the sample scripts posted above.
Have fun
Monday, October 29, 2007
Friday, October 26, 2007
Promoting your W2K8 core to Domain Controller
To promote our W2K8 core server, we need to have an answer file for an unattented installation, since the GUI is no longer available.
Our answer file we can create on an existing DC, for example a W2K3 domain controller.
1. insert the W2K3 installation CD/DVD in your machine and extract the file ref.chm which is located in \SUPPORT\TOOLS\DEPLOY.CAB and select a destination
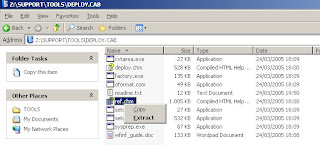
2. open the ref.chm file, click on Unattend.txt, then click on [DCInstall], scroll down to the example and copy this to a notepad.
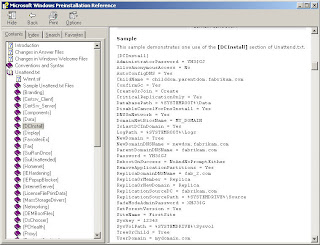
3. adjust the answer file to your needs. Look for more information in the ref.chm file.
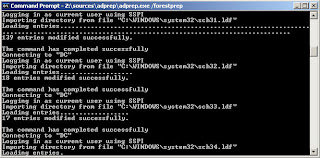
4. run adprep /forestprep on the installed DC to prepare the forest for a new DC. This can be found on the W2K8 installation DVD under Sources\ADprep. It should look something like this:
5. next is the domainprep

6. copy the file to your W2K8 core and run Dcpromo /unattend:unattendfile to start the promotion to DC

7. restart the server to apply the changes with the command shutdown /r /t 0
8. check on your original DC the Active Directory Users and Computers to see if your servre is now a domain controller

In this scenario, I've promoted my W2K8 core to a DC in an existing domain. Of course the same procedure can be applied to create a new domain or even forest.
Our answer file we can create on an existing DC, for example a W2K3 domain controller.
1. insert the W2K3 installation CD/DVD in your machine and extract the file ref.chm which is located in \SUPPORT\TOOLS\DEPLOY.CAB and select a destination

2. open the ref.chm file, click on Unattend.txt, then click on [DCInstall], scroll down to the example and copy this to a notepad.

3. adjust the answer file to your needs. Look for more information in the ref.chm file.
4. run adprep /forestprep on the installed DC to prepare the forest for a new DC. This can be found on the W2K8 installation DVD under Sources\ADprep. It should look something like this:

5. next is the domainprep

6. copy the file to your W2K8 core and run Dcpromo /unattend:unattendfile to start the promotion to DC

7. restart the server to apply the changes with the command shutdown /r /t 0
8. check on your original DC the Active Directory Users and Computers to see if your servre is now a domain controller

In this scenario, I've promoted my W2K8 core to a DC in an existing domain. Of course the same procedure can be applied to create a new domain or even forest.
Renaming and joining a W2K8 core to the domain
To further prepare our W2K8 core server for promotion to a DC, we'll have to rename it first and join it to the existing domain.
First we'll rename it, by following these steps:
1. type hostname, to receive your current machine name
2. now type Netdom renamecomputer OldComputerName /NewName:NewComputerName
 3. restart the server by typing Shutdown /r /t 0
Now that our server has the desired name, we can join in to our domain.
1. type netdom join ComputerName /domain:DomainName /userd:UserName /passwordd:*
By putting * behind the password switch, we can enter the password of the user when prompted without having to type it in clear text.
 2. restart the server by typing Shutdown /r /t 0
Configuring an IP address on W2K8 core
By default, your W2K8 core server will receive an IP address from a DHCP server that is connected on the same network. This address, can be reserved in your DHCP.
But of course, you can choose to configure a static IP address. Since I'm planning to promote this server to a DC, I'll need to give it a static IP address.
To do this, we'll have to learn some new command lines:
1. type netsh interface ipv4 show interfaces to receive a list of your NICS.

From the print screen you can see, I have 1 physical NIC in my server and 1 loopback address. Keep the Idx number in mind, we'll need it later
2. type netsh interface ipv4 set address name="ID" source=static address=StaticIP mask=SubnetMask gateway=DefaultGateway and replace the italic with the necessary information

3. type netsh interface ipv4 add dnsserver name="ID" address=DNSIP index=1 to set your DNS server
(Repeat this step as often as there are DNS servers in your domain.

4. type IPconfig /all to see you results

To go back to a DHCP address, type netsh interface ipv4 set address name="ID" source=dhcp.
Installing VMware tools on W2K8 core
OK, I’ve just installed my W2K8 core server on a VMware workstation without any problems, after all the process is a simple next-next finish (to begin with).
Before configuring my server I would first like to install the VMware tools, mostly because of the enhanced mouse & network drivers.

Since there is no standard GUI, we’ll have to go to long way to achieve this.
1. Access to VMware workstation tool bar and under VM, click on Install VMware tools. Now the VMware tool disk is connected to our virtual machine.
2. In the command screen, switch to your CD-drive
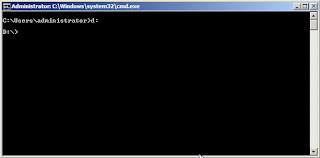
3. Type Setup and press
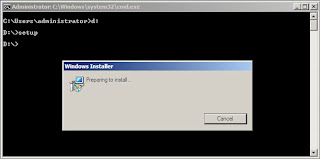
4. follow the GUI portion of the installation

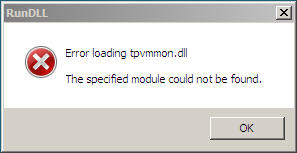
5. you will see an error message appearing.
6. Type Ctrl-Alt-Ins to start the task manager, to go the Applications tab and end all the RUNDLL processes.
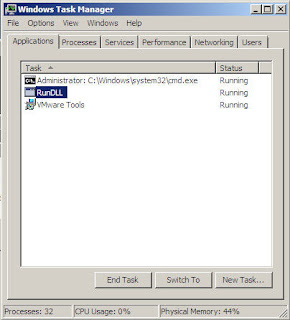
7. Close Task Manager and click OK to any error messages. Setup will continue as normal.
8. Click Finish and click Yes to restart the server

There is nothing more to it ...
Before configuring my server I would first like to install the VMware tools, mostly because of the enhanced mouse & network drivers.

Since there is no standard GUI, we’ll have to go to long way to achieve this.
1. Access to VMware workstation tool bar and under VM, click on Install VMware tools. Now the VMware tool disk is connected to our virtual machine.
2. In the command screen, switch to your CD-drive

3. Type Setup and press

4. follow the GUI portion of the installation

5. you will see an error message appearing.

6. Type Ctrl-Alt-Ins to start the task manager, to go the Applications tab and end all the RUNDLL processes.

7. Close Task Manager and click OK to any error messages. Setup will continue as normal.
8. Click Finish and click Yes to restart the server

There is nothing more to it ...
Wednesday, September 19, 2007
SharePoint Site Moves, Database Moves and Balancing Growth in MOSS 2007
Sharepoint, one of the most hot topics of the moment.
The sites created in MOSS are no longer just an intranet website, but with the integration of various default or custom created applications it is becoming a daily work tool for the users. Account to this that Sharepoint is also slowly replacing the traditional file server as we know it and you'll understand that the underlying SQL databases are growing rapidly to enormous volumes.
MOSS also specifies databases of max. 15 GB, so creating a well thought-out growth plan is crusial. To accomplish this site moves, database moves, database splitting and balancing are at your disposal.
The following article, created by Cory Burns give you a nice overview of these options, together with examples and printscreens. A very interesting article!
Site Moves, DB Moves/Splits and Balancing Growth
Saturday, September 08, 2007
Configuring Kerberos on IIS in a W2K3 domain
Setting up Kerberos on your webservers can be a tricky thing to pull off.
So why would you chose to use Kerberos over NTLM and give yourself the extra work and head-aches? Well, besides from the fact that it is more secure and faster than NTLM, there are extra possibilities. An important function is the “third hop” possibility and the fact that only a single password is requested.
How does it work?
In short, the user receives a Master Ticket at logon, which is encrypted. When he or she wants to access resources from a different server (third hop) the Master ticket is presented in order to obtain a session ticket. No passwords will be required.
Two great information papers on Kerberos can be found at Moron's Guide to Kerberos and Kerberos Technet.
Now that we know what it is, what it does and how, we can start implementing it.
I suggest to first set Kerberos up in a test environment if you are not secure about it. I’ve created a domain just for this purpose. The setup of the DC and IIS are not documentated in this blog.
First step is to make sure that the functional level of our domain is windows 2003.

If your domain in not W2K3, Kerberos is still possible, but some steps will differ slightly. Don’t upgrade your domain without fully knowing the impact!
Second step is verifying the Kerberos policy in the default domain policy (or any other policy on domain level). By default Kerberos is enabled on the computer accounts, but this way we are sure.

Thirdly, we can now trust our IIS server (name IIS in this case) for delegation. Right click on the IIS server and choose Kerberos on the Delegation tab.

As a fourth step, we create a service account in the domain which will be used for authentication between resources.
The fifth step is threefold, which is where it start getting tricky. It’s the little things that make it difficult. These steps are done on the web server.
First we grant the newly created service account the “Log on as a service” in the “Local Security settings” under “User Rights accessment”.
Second, we add the service account to the local group IIS_WPG.
Then we open the IIS manager. In the properties of the Application pool we change the appl pool identity from the default “Network service” to the newly created service account.

Don’t forget to reset the IIS after these steps.
The sixth and last step to the implementation of Kerberos is the creating of the setspn’s, always fun …
Make sure the W2K3 support tools are installed on the DC, open a command screen and run the commands to add the spn. This will of course vary depending on the situation: Setspn –a http/
Notice the http/ not http://, it's a stupid little thing, but it took me hours to figure it out …

With the command setspn –l
Open the concerned website on a client computer and check the security event log on the web server. You should see something that looks like this:
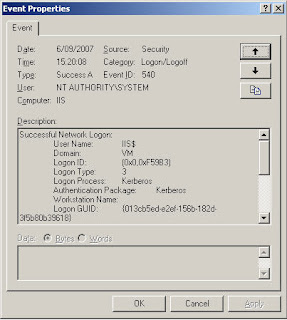
And that’s how simple it can be when you see it all drawn out … :)
Wednesday, August 29, 2007
Looking into Ipv6
As you are well aware, IPv6 is coming so it’s about time we start looking into things to come.
Below I’ve tried to create a short, clearly visible overview of the different kinds of IPv6 addresses and how they are put together.
1. Unicast addresses
Unicast addresses identify a single interface within the scope of a particular type of unicast address.. The following are the different types of unicast addresses.
a) Global addresses
Global addresses are easily recognisable as they are always identified by a Format Prefix (FP) of 001. Since we are still in the design and implementation face I’m sure it doesn’t surprise you to know that naming can still change. Before these addresses were called aggregateable global unicast addresses, but this has been changed to Global Unicast Addresses.
These global addresses are globally routable and reachable of the IPv6 Internet. The scope of these addresses is therefore the entire IPv6 internet.
The structure of a Global Unicast Address allocated by IANA, looks like this. As you can see below, the fields create a three level structure.

If we look deeper into the address, the actual structure of the IPv6 global address can be seen.

TLA ID: Top Level Aggregation ID. It identifies the highest level in the routing hierarchy.
RES: Reserved space for future expansion
NLA ID: Next Level Aggregation ID. It identifies a specific customer site
SLA ID: Site Level Aggregation ID. This is used by an individual organization to identify subents withing their site.
Interface ID: Identifies a specific node of the subnet
b) Site-local addresses
Unlike global addresses, local addresses can be reused (think of the current private ranges). To specify which link on which the destination is located, an additional identifier is needed, the zone identifier (ID), specified as follows: address%zone_ID.
Example: IP Address. . . . . . . . . . : fe80::204:5aff:fe56:f5b%4
Site-local addresses can only be used locally. They are always identified by the FP 1111 1110 11. These addresses are used to communicate between nodes in the same site. The zone ID is the site ID.
The 38 bits that are set to 0 after the first 10 bits are now usuable for subnetting.

c) Link-local addresses
Link-local addresses can only be used locally. They are always identified by the FP 1111 1110 10. These addresses are used to communicate between nodes on the same link. The same 38 bit rule applies here as well. The zone ID is typically the interface index of the interface.
d) Unspecified address
Used only to indicate the adsence of an address, and cannot be assigned to a node. The unspecified address is 0:0:0:0:0:0:0:0 or :: which is the equivalent of 0.0.0.0
e) Loopback address
Used to identify the loopback interface, so a node can send packets to itself. The address is 0:0:0:0:0:0:0:1 or ::1 which is the equivalent of 127.0.0.1
2. Types of Transition IPv6 Addresses
To help you transition from IPv4 to IPv6 and to facilitate the coexistence of both types of hosts, IPv6 defines the following transition IPv6addresses.
a) IPv4-compatible addresses
IPv4-compatible addresses are used by IPv6/IPv4 nodes that communicate with IPv6 over an IPv4 infrastructure. IPv6/IPv4 nodes are nodes that run both the IPv4 and IPv6 protocols. The format for an IPv4-compatible address is 0:0:0:0:0:0:w.x.y.z or ::w.x.y.z (where w.x.y.z is the dotted-decimal representation of a public IPv4 address). The IPv6 protocol for Windows XP and Windows Server 2003 provides support for IPv4-compatible addresses, but support is not enabled by default.
b) IPv4-mapped addresses
IPv4-mapped addresses are used to represent an IPv4-only node to an IPv6 node. The IPv4-mapped address is never used as a source or destination address for an IPv6 packet. It is used only for internal representation. The format for an IPv4-mapped address is 0:0:0:0:0:FFFF:w.x.y.z or ::FFFF:w.x.y.z. The IPv6 protocol for Windows XP and Windows Server 2003 does not support IPv4-mapped addresses.
c) 6to4 addresses
6to4 addresses are used for communicating between two nodes that are running both IPv4 and IPv6 over the Internet. The 6to4 address is formed by combining the prefix 2002::/16 with the 32 bits of the public IPv4 address of the node or the site of the node, thus forming a 48-bit prefix. For example, for the IPv4 address of 131.107.0.1, the 6to4 address prefix is 2002:836B:1::/48 (where 836B:1 is the colon hexadecimal notation for 131.107.0.1). Support for 6to4 addresses is provided by the IPv6 Helper service (known as the 6to4 service) that is included with the IPv6 protocol for Windows XP and Windows Server 2003.
Source: Technet article
Thursday, August 23, 2007
MOSS scheduled jobs may run late or not at all
A known bug has been uncovered in the Sharepoint 2007 environment concerning the execution of scheduled jobs, as described in article KB932563.
In short it comes down to the fact that one-time scheduled jobs can be delayed up to 2 hours, concerning the configured time zone of the MOSS server.
It is probably so that the OWSTimer.exe always assumes the server is configured with the PST time zone.
The problem should be solved in the upcoming SP1 for MOSS, but until then there are several workarounds possible:
1. Schedule the tasks to start one hour earlier.
2. Change the time zone on the servers that are running SharePoint Server 2007 to a similar time zone that does not use DST.
3. Or (my favorite) create a short batch file that forces the jobs to run immediately.
To do so, open notepad and type the following
cd C:\Program Files\Common Files\Microsoft Shared\web server extensions\12\BIN
cls
echo Execute jobs...
stsadm.exe -o execadmsvcjobs
Safe it as a .bat file and launch it whenever you need it.
Wednesday, August 22, 2007
Windows Server 2008 components posters
Microsoft has published two different posters with on them all the new features and AD components that are integrated in the new W2K8 server version.
They provide a strong visual tool to aide in the understanding of various features and components of Windows Server 2008.
One poster focuses exclusively on powerful new Active Directory technologies, while the other provides a technical look at a variety of new features available in Windows Server 2008 (such as Server Core, Network Access Protection, and more).
You can download these posters for free here

I've printed them out on A0 size paper and hung them up in front of my desk. It's a perfect little overview to start testing with new features in a little bit of organized way.
Watch it till it give you nightmares ... :)
Thursday, July 26, 2007
Dataprotector Poor tape reset
The other day at work a whole bunch of backup jobs failed a in the process all the used tapes had been marked red in dataprotector with a "POOR" quality label.
As a result, that tapes are unusable until the retension time expires.
Luckily, there is something you can.
Open a command screen on your DP server and browse to the folder c:\Program Files\OmniBack\bin. Probably best put it in the path, so you can execute commands from anywhere.
Anyway, with the command omnimm you can do all tape & drive related manipulations, perfect for scripting purposes.
One of these options is resetting the tape quality. To do this, execute this command: omnimm -reset_poor_medium
The tape is now back in "GOOD" quality and ready to use.
Wednesday, July 25, 2007
Enable Remote Desktop via registry
Ever configured and installed a PC or server in a remote location only to discover that you have forgotten to enable the "remote desktop" option? I have ...
Luckily, there is no need to jump into your car and drive over there. You can adjust it, like most things, with a simple registry key adjustment.
1. Open the registry editor
2. Connect to the remote computers with the "connect network registry" option
3. find the key fDenyTSConnections located in HKLM\SYSTEM\CurrentControlSet\Control\Terminal Server
4. change value from 1 to 0
A reboot of the computer is not required.
Monday, July 23, 2007
AD must have tools
Brian McCann has written an article on his site on which tools are must have for any 'lazy' IT'er.
I'm sure that most of you already know and use the tools:
- GPMC
- GP inventory
- ADMT
- DStool
But this here is really interesting and not so much know:
- PolicyMaker Registry Extension (with this you can actually change registry settings via GPO!)
- Account lockout & management tools: acctinfo.dll, ALoInfo.exe & EventCombMT.exe (Registering this dll will add an extra tab in your AD users & computers with all the account info which not visible before!)
- Remote control add-on (add to the right-click menu in your AD users & computers an option "Remote control" for easier access to the computer)
Except for the policy maker (which is freeware), these tools are all part of Microsofts Resource kit. So fully legal & fully supported.
I've been using these enhancements now for a month a like them so much I wonder how I managed before. A real tip!
Anyway, read his whole article here:
Must have AD tools
Friday, July 20, 2007
Mighty ESXpatcher
Patching you ESX server is a complicated process if it is done manually: copying and extracting every patch manually to every ESX server, running the necessary commands via a SSH, rebooting the server, ...
Now, there is a patch management tool from VMTS which can be found at http://www.vmts.net/VMTSPatchManager.htm. A freeware tool which does most of the work for you.
However, it is quite difficult to set up, since it needs several requirements to be met: installing putty.exe in the correct path, installing winSCP & correct configuration, FTP server, extracting the patches with winRAR, ...
I've found online a tool which does everything for you, created by Peter Rudolf. It can be found at Mighty ESX patcher.
It's an incredible simple GUI that will install all your ESX patches for you. When there are patches for a wrong system for example ESX 3.0.0, it will skip them and notify you.
To use this tool, just install it on your client computer which is connected to your network, download the required ESX patches from , safe them in this folder: C:\Program Files\esxpatcher\patches\3.0.1 and then connect to your ESX server in the tool.
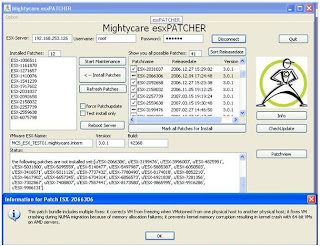
As you can see in the print screen, you will see all the available patches which you have downloaded, which patches already have been installed, progress status, ...
When you click on "Install patches", the tool will do everything automatically: put the ESX in maintenance mode, opening the firewall ports, installing the patches, rebooting, ...
It's just that simple.
There is however 1 known issue you have to know about: it's still a beta version, so it's being worked on, but ... Even though the program works perfectly for me, when it hits the part of actually installing the patches, the computer will tell you that the program stopped responding and asks you to shut it down or wait. Click on "WAIT", the program did not stop, it is functioning correclty. When the patching is done (which can be an hour or longer), the program will tell you all the results you need.
Thursday, July 05, 2007
Crashing mailbox/public folder store on Exchange 2000
When you have a mailbox or public folder store on an Exchange 2000 which has crashed, changes are pretty good that the database size has exceeded its maximum permitted size of 16 GB.
Check your eventviewer to see if you see messages:
Event ID: 1112
Description: The database "Mailbox Store" has reached the maximum allowed size. Attempting to unmount the database
Event ID: 445
Description: Information Store (3160) The database D:\Program Files\Exchsrvr\MDBDATA\priv1.edb has reached its maximum size of 16383 MB.
This is default behaviour, designed by Microsoft to protect the database from inserting more data than it can handle.
There are 2 things you can do to rectify the problem, which are probably best used together:
1. Temporarily increase the limit size to 17 GB, mount the store back in your exchange server and start archiving/deleting old mails.
To increase the limit size it suffices to locate the registry key add the registry key [HKEY_LOCAL_MACHINE\SYSTEM\CurrentControlSet\Services\ MSExchangeIS\AEX\Private-15908017-eb7c-473f-93a9-6e5ab8762fc7] and adding a REG_DWORD value
Temporary DB Size Limit Extension with the value of 1.
This value is only read when the database is started, so in the services we have to restart the Microsoft Exchange Information Store.
2. After you've succesfully mounted the store in you exchange and archived/deleted old mails, you'll notice that the size of the database file priv1.ebd is still the same value. That is because the data is removed from the database, but the remaining data does not move up, thus creating white spaces in the database.
To physically shrink this file, we have to perform an offline defragmentation.
To do this we Dismount the store in your exchange system manager and then run the eseutil from the command prompt. This util is located in the \Exchsrvr\bin folder on your server.
Execute the command: eseutil /d
Be advised that this offline defragmentation can easily take 4 hours or more, depending on the hardware and the state of the database.
Also ensure that you have at least 110 % of the current database size of free space left on the partition, otherwise the offline defrag will fail!
Further options with this eseutil are repairing the database (/p), checking the integrity (/g), recovery (/d), restore (/r).
Last, but not least important, don't forget to remove the registry key, so you still have options next time you have this problem ...
Friday, June 22, 2007
Errors 7076, 6482 & 6398
Ever since the installation of MOSS 2007 on our server, the application event log filled up with the errors 7076, 6482 and 6398. Each of these messages have as message: Attempted to read or write protected memory. This is often an indication that other memory is corrupt.

Secondly, you'll notice that the IIS administration is not showing any web sites or application pools. The only way to administer the IIS at that moment is to reboot the server.
All of these messages are linked with 1 problem: .NET framework 2.0
Microsoft has released a patch for this problem, to install only when you experience this problem: http://support.microsoft.com/kb/923028/en-us .
After applying this patch, the error messages should stop and the IIS is back online.
Tuesday, June 05, 2007
SQL 2005 takes extremely long to install
The other day I had to install a SQL 2005 server at a client to host his sharepoint services.
During the initial setup, no specific options were chosen (mixed authentication, default instance, default corralation, ...), but once the installation got to the "Creating local accounts" and "Settings File security" of the database creation portion, the installation got really slow. In the verbose logging, you saw that the installation did about 3 - 4 settings every 10 minutes!!
This is a known issue when installing on a server which is in a domain that has many external trusts. However, I experienced this in a single domain setup.
Luckily, there are 2 ways around this.
First, is the "quick and dirty" way.
Go to the server locally, so not via a remote desktop and disable the various NIC's. It's ok to do this while the installation is still running. Also if you've specified a domain service account for SQL to run on.
You'll notice the installation continues in a normal pace.
When the installation is done, just re-enable the NIC's and connect to your SQL management suite.
Second, is the more difficult but clean way, especially if you know you have to do this more than just once.
1. Contact Microsoft to obtain hotfix KB901530 (it is not available for download from their site)
2. extract the hotfix in a folder
3. run the .exe with /X to extract them to seperate new folders
AS2005-KB901530-x86-ENU.exe /X:C:\QFE\AS
SQL2005-KB901530-x86-ENU.exe /X:C:\QFE\SQL
DTS2005-KB901530-x86-ENU.exe /X:C:\QFE\IS
NS2005-KB901530-x86-ENU.ex /X:C:\QFE\NS
RS2005-KB901530-x86-ENU.exe /X:C:\QFE\RS
SQLTools2005-KB901530-x86-ENU.exe /X:C:\QFE\Tools
SQLSupport2005-KB901530-x86-ENU.exe /X:C:\QFE\SqlSupport
4. install SQL 2005 with the command:
\Servers\setup.exe SQLSUPPORTPATCH="C:\QFE\SqlSupport\msp\SqlSupport.msp" HOTFIXPATCH="C:\QFE\AS\hotfixas\files\sqlrun_as.msp;
C:\QFE\SQL\hotfixsql\files\sqlrun_sql.msp;
C:\QFE\IS\hotfixdts\files\sqlrun_dts.msp;
C:\QFE\NS\hotfixns\files\sqlrun_ns.msp;
C:\QFE\RS\hotfixrs\files\sqlrun_rs.msp;
C:\QFE\Tools\hotfixtools\files\sqlrun_tools.msp"
Enjoy!
During the initial setup, no specific options were chosen (mixed authentication, default instance, default corralation, ...), but once the installation got to the "Creating local accounts" and "Settings File security" of the database creation portion, the installation got really slow. In the verbose logging, you saw that the installation did about 3 - 4 settings every 10 minutes!!
This is a known issue when installing on a server which is in a domain that has many external trusts. However, I experienced this in a single domain setup.
Luckily, there are 2 ways around this.
First, is the "quick and dirty" way.
Go to the server locally, so not via a remote desktop and disable the various NIC's. It's ok to do this while the installation is still running. Also if you've specified a domain service account for SQL to run on.
You'll notice the installation continues in a normal pace.
When the installation is done, just re-enable the NIC's and connect to your SQL management suite.
Second, is the more difficult but clean way, especially if you know you have to do this more than just once.
1. Contact Microsoft to obtain hotfix KB901530 (it is not available for download from their site)
2. extract the hotfix in a folder
3. run the .exe with /X to extract them to seperate new folders
AS2005-KB901530-x86-ENU.exe /X:C:\QFE\AS
SQL2005-KB901530-x86-ENU.exe /X:C:\QFE\SQL
DTS2005-KB901530-x86-ENU.exe /X:C:\QFE\IS
NS2005-KB901530-x86-ENU.ex /X:C:\QFE\NS
RS2005-KB901530-x86-ENU.exe /X:C:\QFE\RS
SQLTools2005-KB901530-x86-ENU.exe /X:C:\QFE\Tools
SQLSupport2005-KB901530-x86-ENU.exe /X:C:\QFE\SqlSupport
4. install SQL 2005 with the command:
C:\QFE\SQL\hotfixsql\files\sqlrun_sql.msp;
C:\QFE\IS\hotfixdts\files\sqlrun_dts.msp;
C:\QFE\NS\hotfixns\files\sqlrun_ns.msp;
C:\QFE\RS\hotfixrs\files\sqlrun_rs.msp;
C:\QFE\Tools\hotfixtools\files\sqlrun_tools.msp"
Enjoy!
Friday, June 01, 2007
PAC files
PAC stands for "Proxy Auto Configuration"
With a PAC file we can define how web browsers can automatically choose the appropriate proxy server for looking up a given URL. This is done based on a JavaScript function "FindProxyFor URL(url, host)".
To use PAC, you publish a PAC file on a Web server and instruct your browser to read it.
This can be done manually by open a web browser on the client and navigating to: tools - internet options - Connections - LAN settings - Use automatic configuration script and entering the path where the PAC file is located. Of course, it can also be done on a larger scale by defining the PAC file in a client applied GPO.
There is a catch! Due to security restrictions of Windows 2003 servers, you must instruct your web server to declare the mime type of this file to be: application/x-ns-proxy-autoconfig. On Windows 2000 servers, this is not necessary.
The Mime type can be added on your IIS server under the tab "HTTP" and clicking on "MIME".
Examples of PAC-files which can be easily adjusted to your needs.
Simple PAC file
function FindProxyForURL(url, host)
{
if (isInNet(myIpAddress(), "192.168.1.0", "255.255.255.0"))
return "PROXY 192.168.1.1:8080";
else
return "DIRECT";
}
More complex PAC file
function FindProxyForURL(url, host)
{
if (shExpMatch(url, "http://principia.mo.techpaths.com*")) {
return "DIRECT";
}
if (isInNet(myIpAddress(), "192.168.1.0", "255.255.255.0"))
return "PROXY 192.168.1.1:8080";
else
return "DIRECT";
}
Complex PAC file
function FindProxyForURL(url, host)
{
// variable strings to return
var proxy_yes = "PROXY 192.168.1.1:8080";
var proxy_no = "DIRECT";
if (shExpMatch(url, "http://www.mycompanywebsite.com*")) { return proxy_no; }
if (shExpMatch(url, "http://www.myotherwebsite.com*")) { return proxy_no; }
if (shExpMatch(url, "http://www.my3rdlocalsite.com*")) { return proxy_no; }
// Proxy anything else
return proxy_yes;
}
Very complex PAC file
function FindProxyForURL(url, host)
{
// variable strings to return
var proxy_yes = "PROXY 192.168.1.1:8080";
var proxy_no = "DIRECT";
if (shExpMatch(url, "http://www.mycompanywebsite.com*")) { return proxy_no; }
if (shExpMatch(url, "http://www.myotherwebsite.com*")) { return proxy_no; }
if (shExpMatch(url, "http://www.my3rdlocalsite.com*")) { return proxy_no; }
if (shExpMatch(url, "http://192.168.1.100*")) { return proxy_no; }
// Proxy if PC is on local LAN
if (isInNet(myIpAddress(), "192.168.1.0", "255.255.255.0"))
return "PROXY 192.168.1.1:8080";
else
return "DIRECT";
}
Manually demoting a DC
Demoting a DC is not easy when this domain controller has replication and connectivity problems with the other DC's. This can happen if for example a DC in a remote site is unable to contact the main site when the link is down.
However, it is possible, and this is how:
First: We need to demote the DC with the dcpromo command. To do this we open the run command box and type "dcpromo /forceremoval". This switch will make sure the DC will remove all it's AD features without contacting the other domain controllers. Of course, the metadata on the remaining DC's will have to be cleaned up, otherwise they won't realise the DC has been demoted to a member server.
To do this, we use the ntdsutil tool.
These are the required steps to follow:
Click Start, point to Programs, point to Accessories, and then click Command Prompt.
At the command prompt, type
ntdsutil
Type
metadata cleanup
Based on the options given, the administrator can perform the removal, but additional configuration parameters need to be specified before the removal can occur.
Type
connections
This menu is used to connect to the specific server on which the changes occur. If the currently logged on user does not have administrative permissions, alternate credentials can be supplied by specifying the credentials to use before making the connection. To do so, type
set creds domain
Type
connect to server
You should receive confirmation that the connection is successfully established. If an error occurs, verify that the domain controller being used in the connection is available and the credentials you supplied have administrative permissions on the server.
Note: If you try to connect to the same server that you want to delete, when you try to delete the server that step 15 refers to, you may receive the following error message: Error 2094. The DSA Object cannot be deleted0x2094 Note: Windows Server 2003 Service Pack 1 eliminates the need for steps 3 and 4.
Type
quit
Type
select operation target
Type
list domains
A list of domains in the forest is displayed, each with an associated number.
Type
select domain
where number is the number associated with the domain to which the server you are removing is a member. The domain you select is used to determine if the server being removed is the last domain controller of that domain.
Type
list sites
Type
select site
Type
list servers in site
Type
select server
Type
quit
Type
remove selected server
You should receive confirmation that the removal completed successfully. If you receive the following error message:
Error 8419 (0x20E3) The DSA object could not be found
the NTDS Settings object may already be removed from the Active Directory as the result of another administrator removing the NTDS Settings object, or replication of the successful removal of the object after running the DCPROMO utility.
Note: You may also see this error when you attempt to bind to the domain controller that is going to be removed. Ntdsutil needs to bind to a domain controller other than the one that is going to be removed with metadata cleanup.
Type
quit
at each menu to quit the NTDSUTIL utility. You should receive confirmation that the connection disconnected successfully.
Remove the cname record in the _msdcs.root domain of forest zone in DNS. Assuming that DC is going to be reinstalled and re-promoted, a new NTDS settings object is created with a new globally unique identifier (GUID) and a matching cname record in DNS. You do not want the DC's that exist to use the old cname record.
As best practice you should delete the hostname and other DNS records. If the lease time that remains on Dynamic Host Configuration Protocol (DHCP) address assigned to offline server is exceeded then another client can obtain the IP address of the problem DC.
Now that the NTDS setting object has been deleted we can now delete the following objects:
1. Use ADSIEdit to delete the computer account in the OU=Domain controllers,DC=domain...
Note: The FRS subscriber object is deleted when the computer object is deleted, since it is a child of the computer account.
2. Use ADSIEdit to delete the FRS member object in CN=Domain System Volume (SYSVOL share),CN=file replication service,CN=system....
3. In the DNS console, use the DNS MMC to delete the cname (also known as the Alias) record in the _msdcs container.
4. In the DNS console, use the DNS MMC to delete the A (also known as the Host) record in DNS
Adminpak on Vista
Those of you who have already tried to run the adminpak on your Vista computer will have noticed the installation goes fine but you are unable to open the snap-ins.
In order for the snap-ins to work, you have to add some dll's to the registry.
So first install the correct adminpak (currently: adminpak W2k3 SP1) on your PC.
Then create a new file on your desktop and name it for example "adminpak.reg".
Copy these dll's in the file.
regsvr32 /s adprop.dll
regsvr32 /s azroles.dll
regsvr32 /s azroleui.dll
regsvr32 /s ccfg95.dll
regsvr32 /s certadm.dll
regsvr32 /s certmmc.dll
regsvr32 /s certpdef.dll
regsvr32 /s certtmpl.dll
regsvr32 /s certxds.dll
regsvr32 /s cladmwiz.dll
regsvr32 /s clcfgsrv.dll
regsvr32 /s clnetrex.dll
regsvr32 /s cluadmex.dll
regsvr32 /s cluadmmc.dll
regsvr32 /s cmproxy.dll
regsvr32 /s cmroute.dll
regsvr32 /s cmutoa.dll
regsvr32 /s cnet16.dll
regsvr32 /s debugex.dll
regsvr32 /s dfscore.dll
regsvr32 /s dfsgui.dll
regsvr32 /s dhcpsnap.dll
regsvr32 /s dnsmgr.dll
regsvr32 /s domadmin.dll
regsvr32 /s dsadmin.dll
regsvr32 /s dsuiwiz.dll
regsvr32 /s imadmui.dll
regsvr32 /s lrwizdll.dll
regsvr32 /s mprsnap.dll
regsvr32 /s msclus.dll
regsvr32 /s mstsmhst.dll
regsvr32 /s mstsmmc.dll
regsvr32 /s nntpadm.dll
regsvr32 /s nntpapi.dll
regsvr32 /s nntpsnap.dll
regsvr32 /s ntdsbsrv.dll
regsvr32 /s ntfrsapi.dll
regsvr32 /s rasuser.dll
regsvr32 /s rigpsnap.dll
regsvr32 /s rsadmin.dll
regsvr32 /s rscommon.dll
regsvr32 /s rsconn.dll
regsvr32 /s rsengps.dll
regsvr32 /s rsjob.dll
regsvr32 /s rsservps.dll
regsvr32 /s rsshell.dll
regsvr32 /s rssubps.dll
regsvr32 /s rtrfiltr.dll
regsvr32 /s schmmgmt.dll
regsvr32 /s tapisnap.dll
regsvr32 /s tsuserex.dll
regsvr32 /s uddi.mmc.dll
regsvr32 /s vsstskex.dll
regsvr32 /s w95inf16.dll
regsvr32 /s w95inf32.dll
regsvr32 /s winsevnt.dll
regsvr32 /s winsmon.dll
regsvr32 /s winsrpc.dll
regsvr32 /s winssnap.dll
regsvr32 /s ws03res.dll
Execute the file. Normally you will receive a message box stating the entries are succesfull in the registry. Then you can delete the file you just created.
Thursday, May 31, 2007
Vista no longer reachable after previous OS version installation in a dual boot
I did a brain dead thing here a few weeks ago, I reïnstalled my XP os on a laptop that has a dual boot XP - Vista.
XP was the first OS and consequently held the boot.ini, after reïnstalling XP the boot.ini had been resetted and Vista was no longer reachable.
Unfortunately, since Vista doesn't use the boot.ini file anymore it is not just a question of adding a file and changing the partition.
Instead we have to go the long way...
1. insert the Vista installation DVD in your computer
2. open a command prompt and run\boot\Bootsect.exe /NT60 All
3. restart your PC and you will see the PC will now automatically boot in Vista
4. in Vista, install EasyBCD (download link: http://neosmart.net/dl.php?id=1)
5. in the button "Add/Remove entries" you can in graphical mode add a second boot option
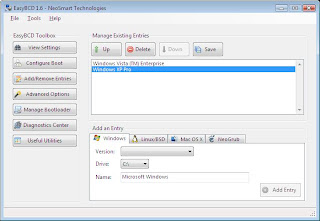
When you now restart your PC, you will see you have the option between the 2 OS versions to boot from.
Enjoy!
XP was the first OS and consequently held the boot.ini, after reïnstalling XP the boot.ini had been resetted and Vista was no longer reachable.
Unfortunately, since Vista doesn't use the boot.ini file anymore it is not just a question of adding a file and changing the partition.
Instead we have to go the long way...
1. insert the Vista installation DVD in your computer
2. open a command prompt and run
3. restart your PC and you will see the PC will now automatically boot in Vista
4. in Vista, install EasyBCD (download link: http://neosmart.net/dl.php?id=1)
5. in the button "Add/Remove entries" you can in graphical mode add a second boot option

When you now restart your PC, you will see you have the option between the 2 OS versions to boot from.
Enjoy!
Thursday, April 19, 2007
Enable Remote Desktop via registry
Ever installed a server for a remote location and once back in your head office you notice you forgot to check the checkbox "Enable Remote Desktop on this computer"? The server works, but it makes administration a whole lot harder.
Luckily, you can enable it via the registry:
1. open the registry and connect remotely to the registry of the server
2. browse to the following key:
HKLM\SYSTEM\CurrentControlSet\Control\Terminal Server
3. Under the Terminal Server key find the value named fDenyTSConnection (REG_DWORD). Change the value data from 1 (Remote Desktop disabled) to 0 (Remote Desktop enabled).
Now close the registry editor and try connecting to your server via remote desktop(mstsc).
If it does not work immediately, you need to reboot the server.
To do this you open a command screen and type the following command:
shutdown -m \\ -r
Et voila...
Luckily, you can enable it via the registry:
1. open the registry and connect remotely to the registry of the server
2. browse to the following key:
HKLM\SYSTEM\CurrentControlSet\Control\Terminal Server
3. Under the Terminal Server key find the value named fDenyTSConnection (REG_DWORD). Change the value data from 1 (Remote Desktop disabled) to 0 (Remote Desktop enabled).
Now close the registry editor and try connecting to your server via remote desktop(mstsc).
If it does not work immediately, you need to reboot the server.
To do this you open a command screen and type the following command:
shutdown -m \\
Et voila...
Wednesday, April 18, 2007
Deleting mail profiles in the registry
The other day I created a new mail profile for a customer, but mistyped and added a non-numeric caracter on the end (µ).
It worked fine, but I decided to I wanted to recreate the profile without the annoying "µ" on the end.
When I tried to delete the profile, I received another clear error message from Microsoft saying: "Error in the application. The profile can not be deleted". So not only did it not delete, it was no also unusuable.
Of course, like almost everything else, it is still possible to delete that profile in the registry. You only have to know where to find it, so here it is:
HKEY_USERS\S-1-5-21-1547161642-1993962763-1957994488-8808\Software\Microsoft\Windows NT\CurrentVersion\Windows Messaging Subsystem\Profiles
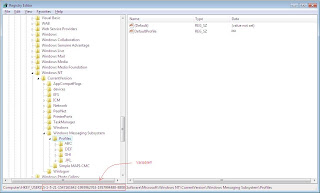
This folder can also be exported and imported on a new PC to easily transfer all your created mail profiles.
Subscribe to:
Posts (Atom)